10.30.2012

Our Wedding: the invitations.


Ben & I decided early on that we wanted our wedding invitations to be unique, personalized, and fun. We quickly set to work on the content, editing his version and my version together to create our story. When it came time to design the invitation I looked to one of my favourite people - Jessica Luch - who also happens to be a creative genius and a graphic designer. I provided Jess with a few pieces of inspiration and asked that it resemble an artistic poster; what she came up with was more than I could have ever imagined. 

Jess linked me up with Manna of Modus Paperie & Press in Vancouver who printed our invitations by letterpress. The beauty of letterpress is that each invitation is hand-printed and therefore unique which is such a special touch.  

The personalization of the envelopes and the postage was a labour of love. After ordering this stamp (by Elise) I knew I had to incorporate it into our invites. Together my bridesmaid Jillian and I shared a bottle of wine and had a ball scripting personalized messages for the envelopes. It was a fun & unexpected way of incorporating personality into our invites. This gorgeous postage stamp featuring Smoothly She Shifted by Canadian artist Joe Fafard was the final touch, tying together our eclectic black and white motif. 

I'm so proud of our invitations and how they became a conversation piece and a true representation of Ben + me. The feedback we received from our guests was overwhelming. We have one framed in our room; they are literally a work of art. 


(invitations designed by Jessica Luch and printed by Modus Paperie & Press. top + bottom photos by Adrian Photography; center photos processed with Instagram). 

10.28.2012

autumnal love


Autumn is my favourite season. Around these parts we're warming up with new hand-knit sweaters, stocking up at the last farmers' market of the year, enjoying pub favourites (deep fried pickles rule my world), getting crafty with DIY projects, baking delicious birthday treats (happy birthday, Jen!), walking through crunchy leaves, adorning the front door with pink pumpkins, and prepping for Wednesday with a couple of favourite halloween decorations.

My heart is happy. What is your favourite thing about fall?


(images processed with Instagram. follow along: username cstarevents).

10.26.2012

Halloween Cat Bunting


This week I was inspired by my new dress and Rubyellen's string lights and decided to create Halloween cat bunting for our entryway.  Even though I'm not a "cat person" this fun project is a homage to the year 6 years I went trick-or-treating as a black cat.  


supplies
- black felt
- string/ ribbon/ rik rak
- dressmakers pins
- fabric scissors 
- sewing machine

directions:
- create a template of the cat head. I drew mine free-hand but there are many clip art images online that would work, too.
- pin template to felt and cut out. Don't be too concerned about making each one perfect; felt holds its shape really well (& I'm partial to variations of the same template).
- sew to string/ ribbon
- hang!


Once I hung the bunting the cats looked lonely and needed something more so I sewed a string of triangle bunting out of the left over felt and hung them together. The result is more whimsical than spooky but that's fine by me. It was a cost effective project (less than $5 to complete) that I assembled in a couple hours. Bonus: it's a holiday decoration that will be easy to store!


Have you crafted anything for Halloween? 


10.22.2012

dream bank.


Every once in a while a product comes along that makes me excited. Enter:  Uncommon Goods' Dream Bank.

Isn't this the perfect way to get excited about a future trip, outfit, or pet? I can also see it as an effective aide to help teach a child how to save money for a special purchase. Heck, it would work on me. Consider this one wish-listed!

Thanks to my sister Jenn for telling me about this.


(photo courtesy of uncommon goods).

10.11.2012

wedding project [seven]: the L-O-V-E sign

As promised, here are the details of our LOVE sign, one of the most well-received (and well-photographed) elements of the reception. 


It must be noted that this project was a last minute a decision but a decision I am very glad I made. After seeing this tutorial, I became obsessed with incorporating Jordan's fabulous Marquee letters into the reception. "LOVE" was the opportune word. 


details

I assembled the supplies and enlisted the design talents of my friend Angie and the fabrication help of my amazing aunt Cath and creatively-inclined cousin Nico. We cut, scored, folded, and taped in the August sunshine, adapting Jordan's tutorial as we went based on the tools we had available. We ended up using the following supplies:

- a string of 25 globe lights
- poster board (x3)
- foam core board (x3)
- exacto knife/ steak knife/ scissors/ pen (for shaping the holes for the lights)
- duct tape
- scotch tape
- rulers
- cutting mat
- spray paint

Once I printed out Angie's template (which printed on 24 letter-sized pages) we taped the letters together and used them to trace onto the foam core board with pencil. There is a "front" and a "back" of the foam core board (one has a slight grid pattern). Once it's spray painted the grid pattern will still be visible; this may or may not be a big deal to you. Consider yourself warned. 

Once the letters were cut out with an array of cutting tools (we got creative) we were left with letters that had somewhat sloppy edges. This is OK as they'll be covered with the strips of poster board. 

Folding the poster board to wrap cleanly around the letters is the tricky part. We followed Jordan's steps which were very straightforward and logical (scoring is KEY). That being said, I recommend that you not attempt this project alone as the logistical/ mathematical/ fabrication part (this includes but is not limited to measuring, determining what part of the edging is the front vs. the back, scoring, folding, holding-in-place, and taping) is a feat in and of itself. Cath and I bounced ideas off of each other, laughed at each other's confusion, and - in the most general of terms - kept each other sane. I couldn't have done it without her.


Another modification we made had to do with the placement of the lights. The string of lights I ordered off of Amazon didn't come with the template that Jordan refers to; therefore, Cath and I divided the total number of lights [25] by the number of letters we had [4] and spaced them out accordingly (the "E" received two extra lights).

Once the letters were sprayed and the lights added it became an instant piece of art. Initially I planned on using the lights in the backyard but I've since decided to keep the letters intact for C Star Headquarters. I love this sign so much and I can't wait to experiment with this project again in the future. Anyone up for craft night?

up next:

Incredibly fun place card holders.

1, 2, 3, 4, 5, 6, 7... Go!

10.10.2012

Ikea Campaign Chest DIY


There are many-an-Ikea-Hack floating around the Internet; you've no doubt come across them on Pinterest.  I'd like to suggest that this Campaign Chest DIY is one of the best.


Louisa of For Chic Sake has mapped out a brilliant DIY tutorial with easy to follow steps and links to all of the supplies she used. I've bookmarked this fuchsia beauty for a future project as it's a very cost effective way to give a tired chest of drawers a make over. 

Visit For Chic Sake for the details and links to many other project details. 


(images courtesy of For Chic Sake). 

White Faux Taxidermy


There is something about this golden skull that I can't get enough of. He's the perfect addition to seasonal Halloween decor but I'd also love to use him year-round as an unexpected addition to a bookshelf. On that note, this guy is on my wish list as well for the living room.

Visit White Faux Taxidermy's shop for more unique pieces (they do custom colour orders)!


(image courtesy of White Faux Taxidermy).


10.09.2012

wedding project [six]: string globes


This project has a back story. Last winter I had a great time collaborating and crafting from afar with my dear friend Nicole when her storefront (that would be my favourite Vancouver eco-boutique, body politic) needed a snowy-inspired window. I assembled a collection of cotton snowballs while Nicole tried her hand at mini string globes. I'm happy to report that our crafting resulted in a beautiful window display at bp (and I'm equally pleased to have received several pieces of pertinent advice from my creatively-inclined friend - Thanks Nicole!) 

Once I spotted these string globes I knew how I was going to incorporate them into our wedding: they were going to be the focal point over the dance floor. 

Cue bridesmaids, tacky glue, and mojitos.
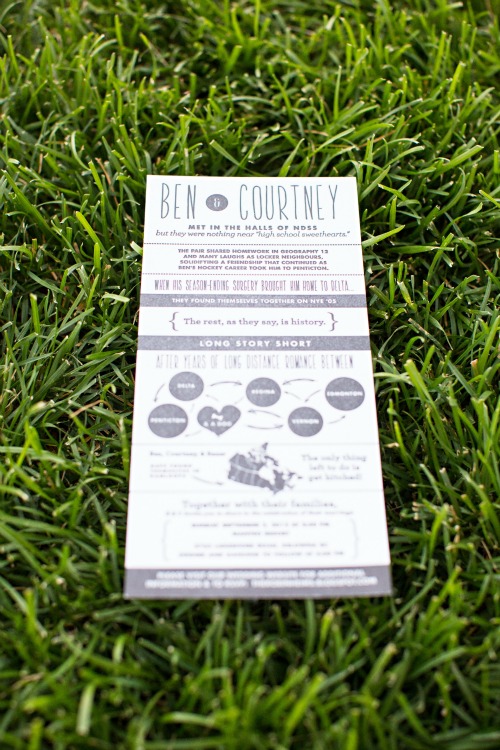

details

Armed with this tutorial and Nicole's advice*, we assembled the supplies: 

- balloons
- white yarn
- ice cream buckets
- warm water
- Vaseline 
- a shower curtain (used as a drop cloth)

I mixed the glue with warm water using the ratio of approximately 2/3 glue, 1/3 water. We blew up the balloons and covered (read: cov-ered) them in Vaseline. The yarn was then dipped into the glue-water mixture and covered until it was good and slimy. 

Here comes the messy part.

We experimented with holding the top of the balloon and the end of the string in one hand while wrapping string around the balloon with the other hand. We also tried tying the end of string TO the end of the balloon and then wrapping the string around the balloon. In any event, we determined that starting at knotted end of the balloon was the easiest. We also quickly learned that the string has to be wrapped quite tightly (the vaseline and glue will keep it in place provided it's tight enough). When we were satisfied with the string coverage we tied the end piece of string to the starting piece of string and/or the end of the balloon. 

On one occasion Angie's partially-covered balloon exploded in her face, causing Jenn to yell-scream bloody murder and vaseline and glue covered string to fly all over the wall, door, and ceiling. This was the most traumatic and the most hilarious thing to happen to us the entire weekend.  Note: vaseline is near impossible to wipe off the ceiling. 


To dry the globes, we arranged several hockey sticks (thanks, B) on chairs and hung the balloons by baker's twine, ensuring they didn't touch. Our string dripped quite a bit so I'd suggest putting a drop cloth or newspaper underneath. Before I packed them up to travel to Kelowna and again before they were hung at the reception the globes were sprayed with Tacky spray glue which really helped them keep their shape. 

The end result was a gorgeous little cluster cloud over our dance floor that reflected the light perfectly and added a fun element to the space. I'd love to try my hand at these again in the future, possibly on a smaller scale for Christmas ornaments. Big love and many thank you's to Angie, Jen, Jen, and Jenn for helping to assemble these tricky little buggers; to Mike and Amber for transporting them (only one popped!); and to my amazing all-male assembling crew of Brock, Sean, and Chris who teetered atop a ladder while this bridezilla glowing bride art directed from below. I must also thank Nicole for her seasoned advice and crafting encouragement. 


c's advice

The ratio of water to glue I used worked well; however, it is very important to ensure your string/ yarn is saturated before wrapping it around the balloon, otherwise as soon as the balloon is popped, the string goes limp. 

Let the string dry for longer than you think it will take the string to dry. I left mine for a couple of months (I wish I was joking).

Leave the balloons intact until they are ready to be hung. We didn't pop them until my assembly team had arranged them over the dance floor. 

*n's advice:

Use white string or yarn in lieu of a heavier string or twine as it's much easier to saturate the string if it's lighter in weight.  Otherwise, be prepared to let the string sit in the glue for a lot longer and give the globes a lot longer to dry. 

Cover all sides of the balloon (somewhat) evenly. It makes a more spherical final product. 


up next

Love, Love, Love.  The how-to behind the Marquee-inspired sign in the first photo. 

1, 2, 3, 4, 5, 6... Go!


10.05.2012

Thanksgiving at the Cabin


The air is crisper, the days are shorter, and I have an incessant desire to bake and consume comfort foods. Welcome, fall!

Even though I’m having a hard time believing it’s already October, I am so excited to be celebrating Thanksgiving at the cabin this weekend. Crafting, hiking, singing, pumpkin beer taste-testing, and some sparkler-waving whilst dancing-in-the-moonlight are on the agenda but I’m most excited to spend time with my family.  

I'm powering down to enjoy an unplugged weekend at the cabin so I wishing you a happy weekend and thank you for your patience while I transition back into blogging. Big love, friends.

To celebrate the last 2012 visit to the cabin, I put together a funky folky mix for your listening pleasures. Enjoy!

  1. Let Her Go – Passenger
  2. Trek – Spencer & Antfood
  3. Flight of the Crow – Passenger (feat. Josh Pyke, Lior, Katie Noonan, Boy & Bear, and Jess Chalker)
  4. A Summer Song – Conner Youngblood
  5. I Wanna Go – Summer Heart
  6. Sabali – Amadou & Mariam
  7. Breakneck Speed – Tokyo Police Club
  8. Wild Blood – Lovedrug
  9. Submarines – The Lumineers
  10. Love is All – The Tallest Man on Earth
  11. White Winter Hymnal – Fleet Foxes
  12. Hold On – Alabama Shakes
  13. The Great Escape – Patrick Watson
  14. Sing to the Mountain – Elephant Revival
  15. Down in the Valley – The Head & The Heart
  16. Whiskey – Trampled by Turtles
  17. Old Pine – Ben Howard
  18. Dirty Paws – Of Monsters and Men
  19. Holland, 1945 – Canoe
  20. We Don't Eat – James Vincent McMorrow

Looking for more? Check out these playlists... 

Related Posts Plugin for WordPress, Blogger...